Please read this manual carefully before using Mega. Following the instructions will
help you complete the setup efficiently.
The entire setup process takes approximately 120 minutes.
¶ 1. Preparations
¶ 1.1 Inspect for Visible Damage
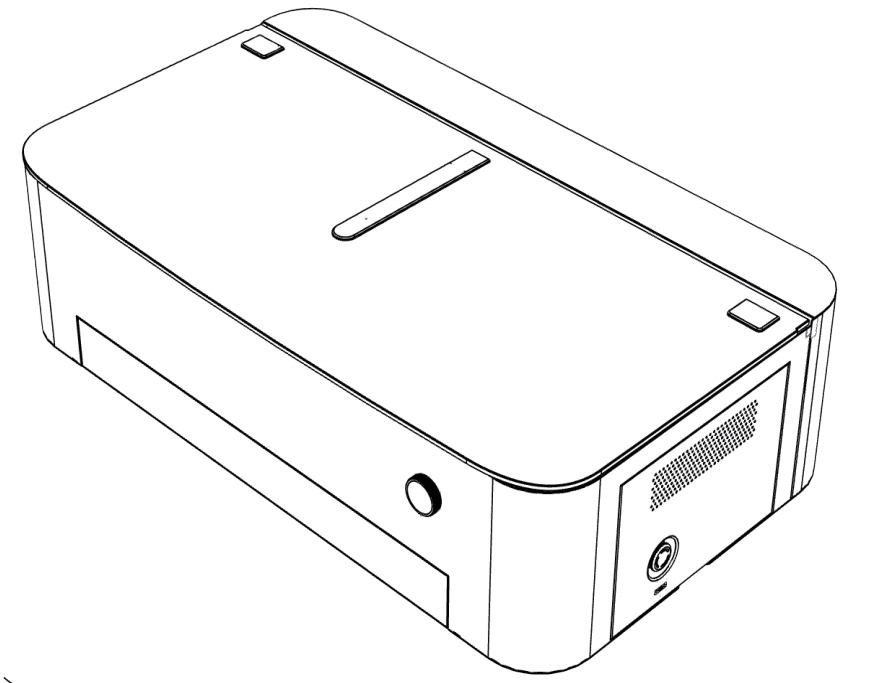
Before using Mega, check for any visible damage:
- Damage to the packaging
- Deformation of the machine’s outer shell
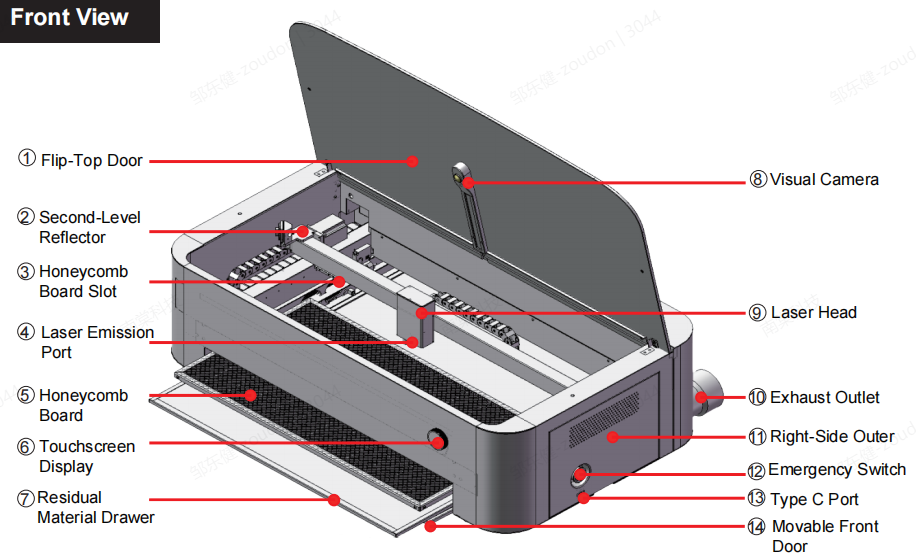
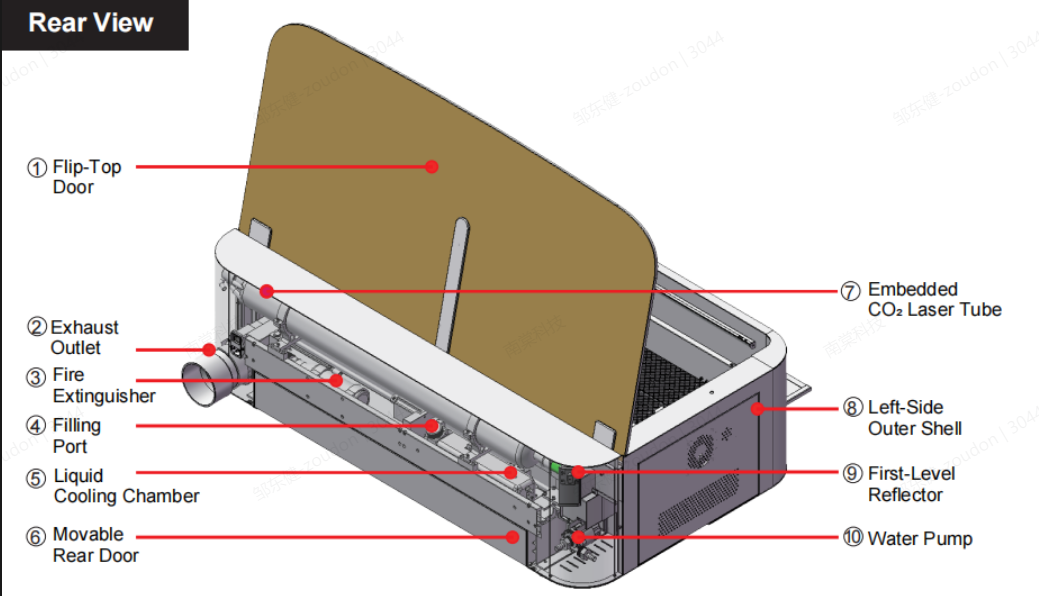
Below are the front and rear views of Mega:
¶ 1.2 Accessories Checklist
Upon opening the package, you should find the following accessories.
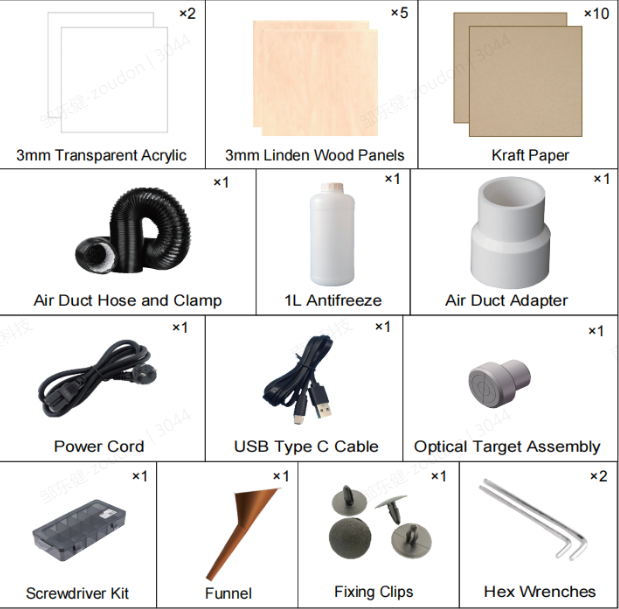
Please carefully check and if anything is missing, contact us at:mailto:support@monportlaser.com
¶ 1.3 Add Coolant
(Water Pump Must Be Turned On First, Then the Machine Turned Off)
Mega requires coolant (water or antifreeze) before use. Turn on the water pump first to
allow circulation and prevent air from entering the system.
Use different coolant ratios depending on the temperature. Refer to the table below for details:
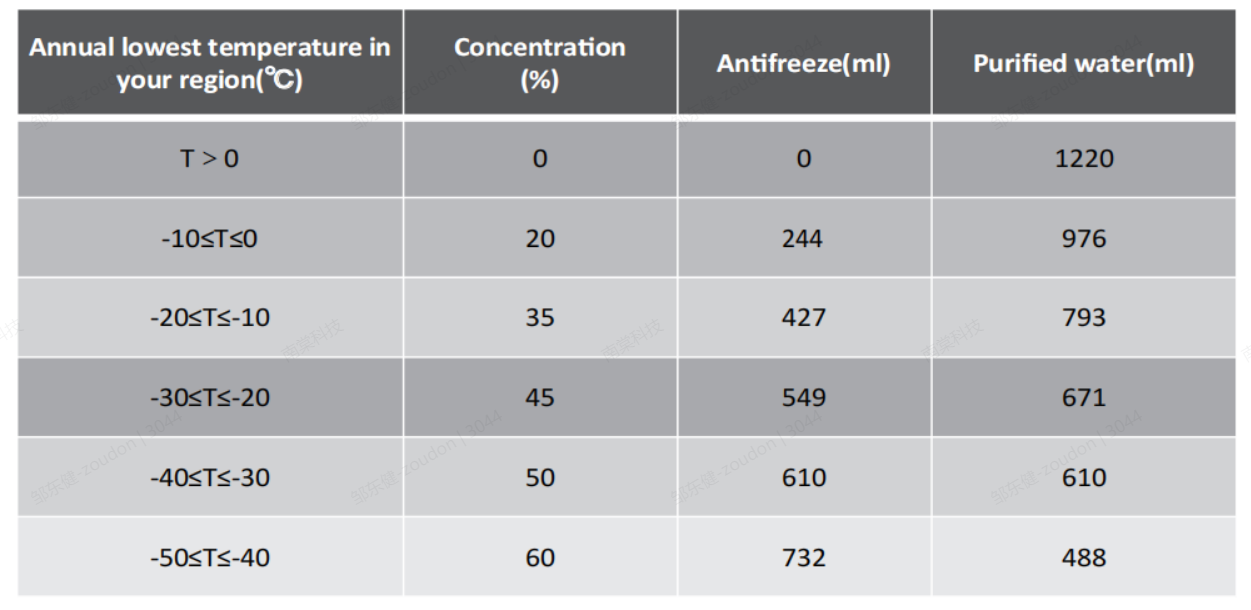
Steps to Add Coolant:
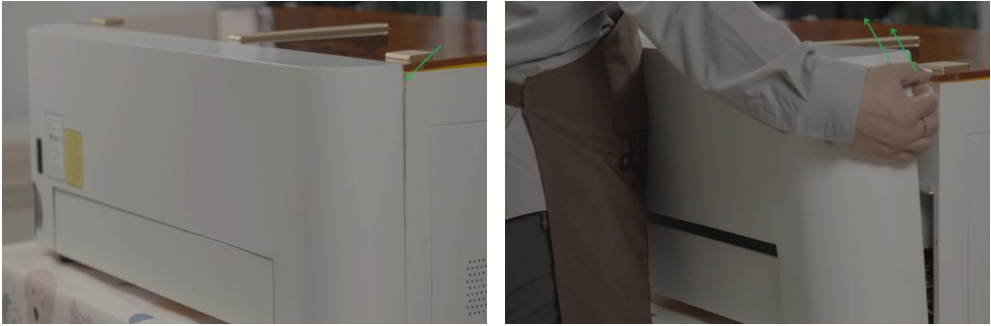
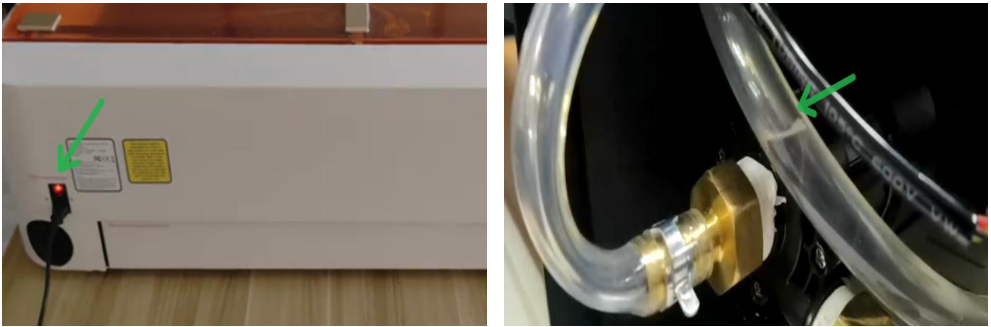
Step 1: The machine’s back cover is not screwed in by default. Remove it as shown:
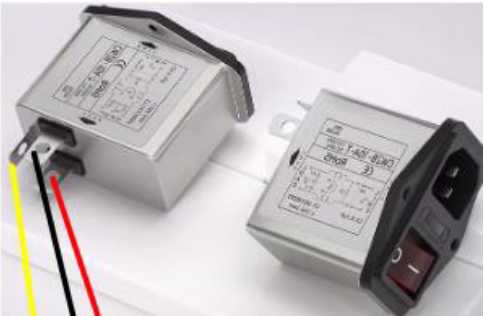
Important: If you accidentally disconnect
the power cord while removing the cover,
reconnect it as shown:
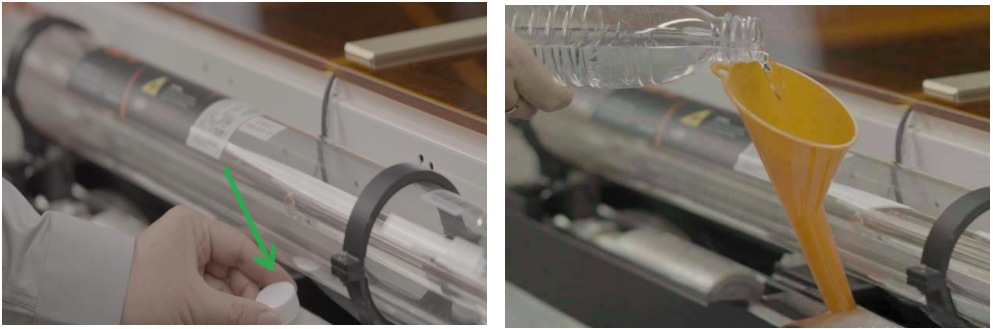
Step 2: Unscrew the water tank cap.
Step 3: Fill the tank until it’s at least two-thirds full.
Step 4: Turn on the machine to activate the water pump. It will automatically circulate
water through the pipe.
Once the water pipe is filled, the water level in the tank will drop significantly. Refill
the tank until it is again at least two-thirds full. The coolant setup is now complete.
¶ 1.4 Remove the X-Axis Fixing Bracket
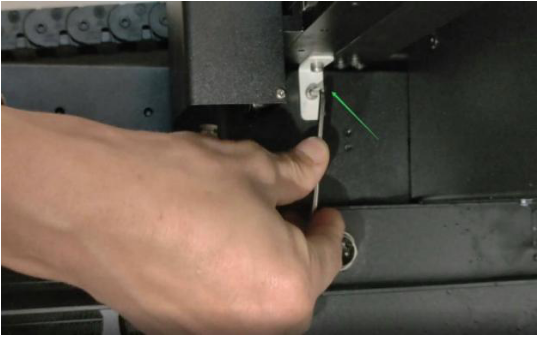
Remove the fixing brackets on both sides
of the machine.
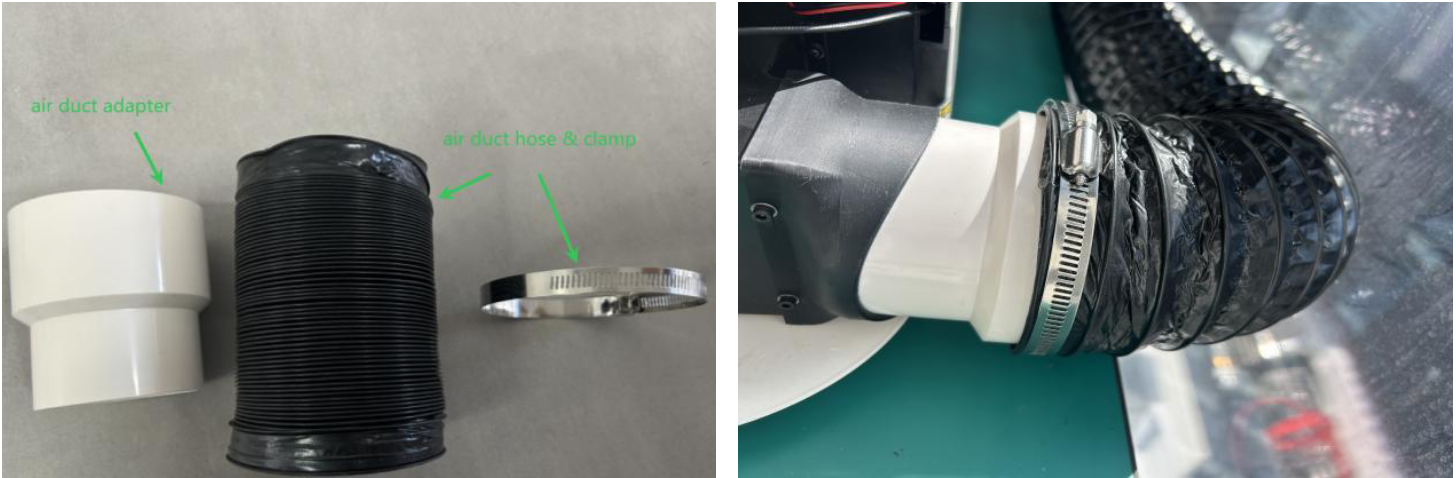
¶ 1.5 Connect the Air Duct Hose
To ensure proper ventilation, we recommend installing the exhaust duct before using
Mega.
Step 1: Gather the required parts: duct adapter, duct hose, and hose clamp.
Step 2: Insert the duct adapter into the machine.
Step 3: Attach the duct hose to the adapter.
Step 4: Secure the hose with the clamp.
¶ 1.6 Prepare a Windows PC
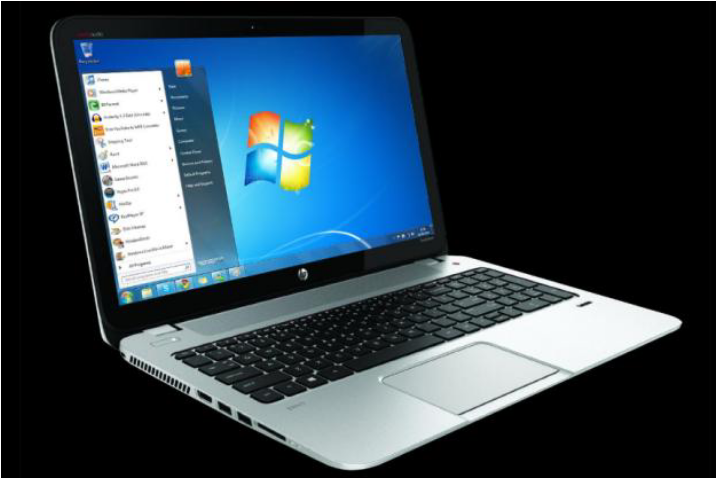
Important:
Due to compatibility issues with the Mac
version of M-Design Hub (MDH), we
strongly recommend using a Windows
laptop to operate the Mega engraving
machine for optimal
performance—especially for network
configuration.
¶ 1.7 Ensure a Stable Network Connection
To ensure smooth operation, place the Mega engraving machine in an area with a strong
and stable Wi-Fi signal. Many of its functions rely on Wi-Fi, and a poor connection may
affect performance.

The Wi-Fi antenna is located on the side of the machine. For the best signal strength:
- Position the antenna-facing side toward
your router.
- Avoid placing metal objects near the
antenna, as they may interfere with the
signal.
¶ 2. Network Configuration & Firmware Upgrade
To ensure the best user experience, we recommend upgrading your Mega engraving
machine’s firmware to the latest version before use.
¶ 2.1 Software Download & Installation
- Download the M-Design Hub
https://github.com/Monport-Laser-Office/Monport-Design-Hub/releases
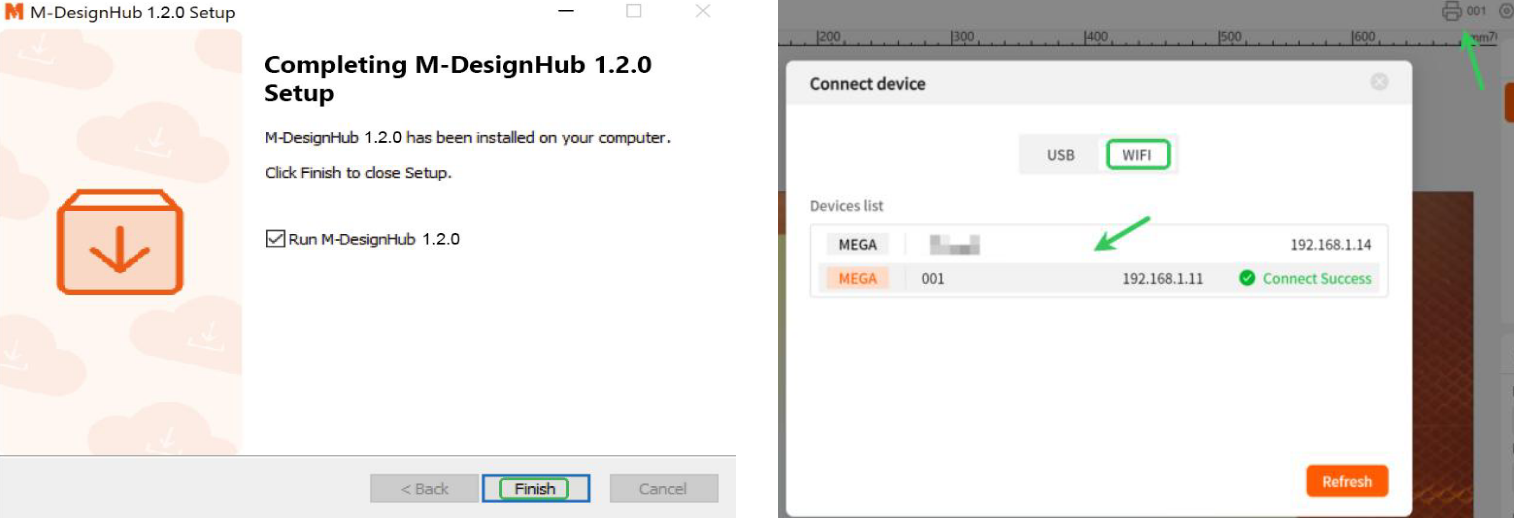
- Install following the on-screen instructions.
¶ 2.2 Configuring Mega’s Network via MDH
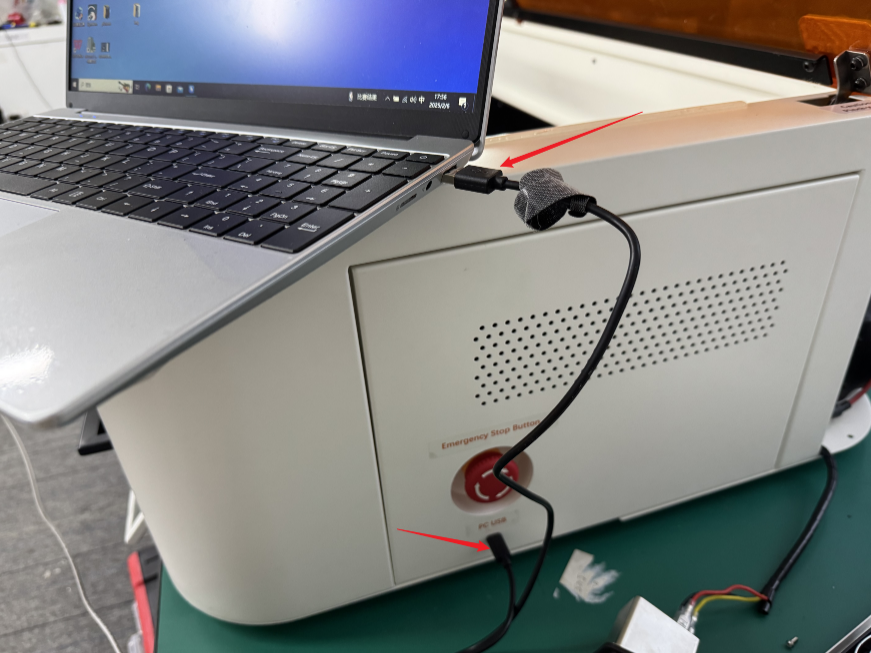
- Before configuring the network, prepare a USB-Type-C data cable.
- Set up Wi-Fi using USB first.
- If no network is available, you can connect the machine directly via USB, but note
that USB is slower and not recommended for long-term use.
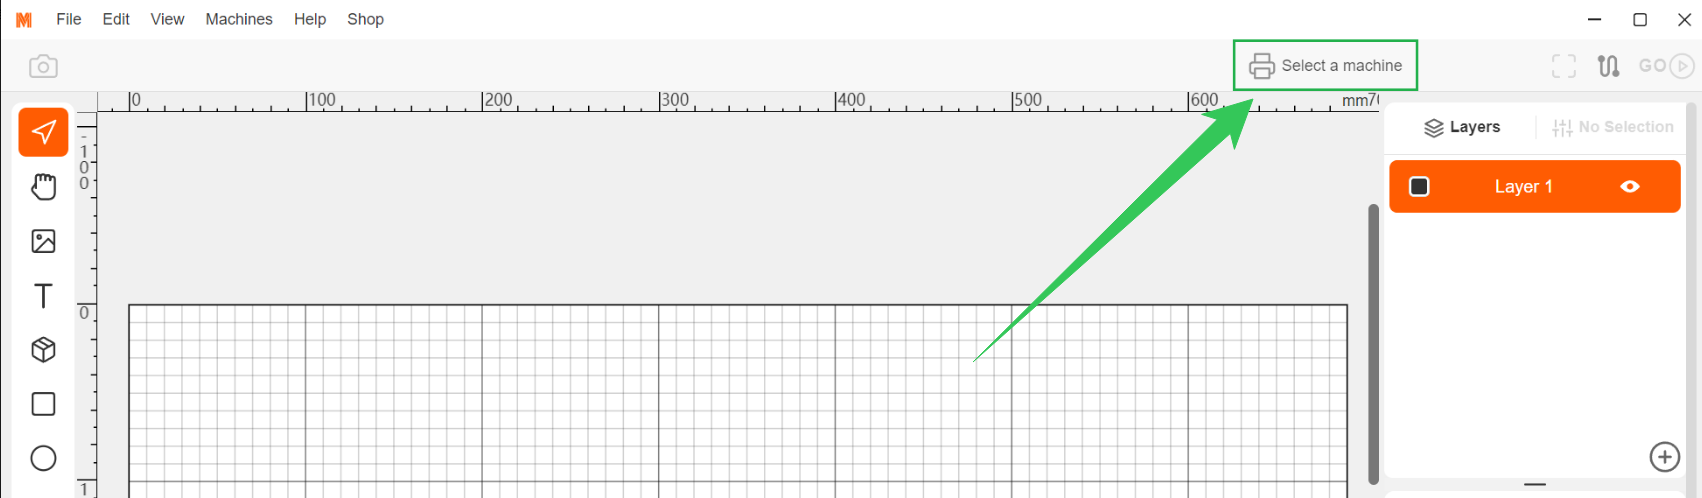
Step 1: Open M-Design Hub
Step 2: Connect the Device via USB
- Connect the Mega device to your
computer via a USB-Type-C cable,
then turn it on. The computer will
automatically detect and connect to
the device.
- Click "Select a machine".
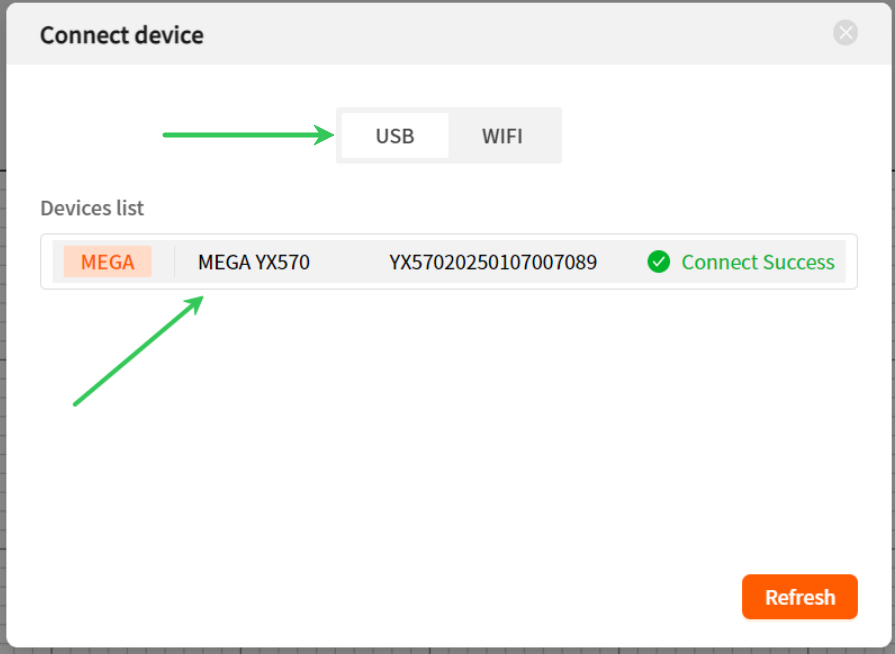
- You'll see your device name in the
"Connect device" > "USB” page,
indicating a successful USB
connection.
If the USB-connected device fails to recognize the COM serial port device, please download the serial port driver and install it before trying again. ——CH341SER.EXE——
Important: If your device doesn't show
up in the USB Devices list after plugging
in the cable, contact our after-sales
support at: support@monportlaser.com
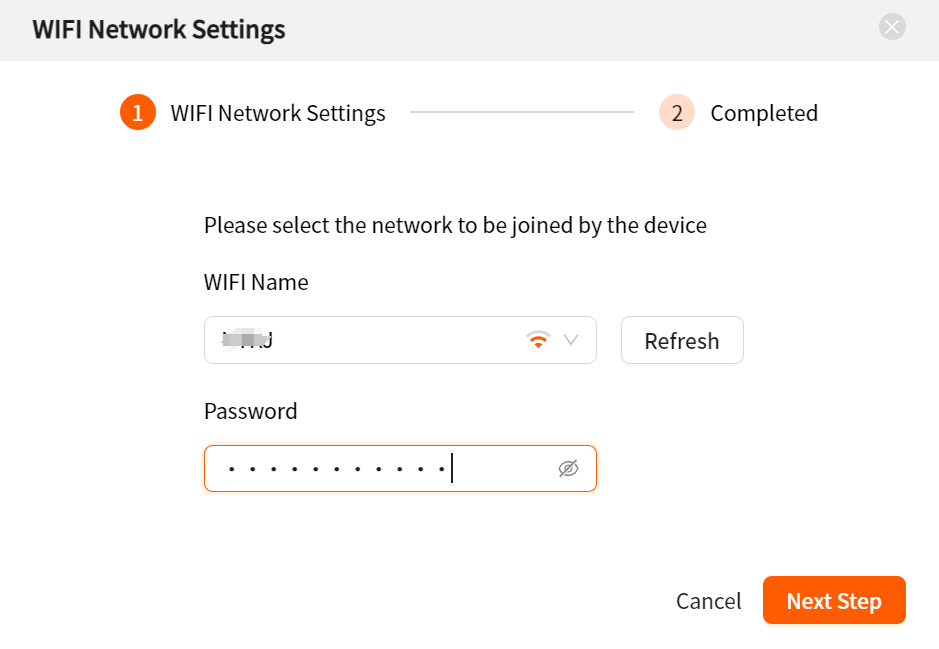
Step 3: Connect the Device via WiFi
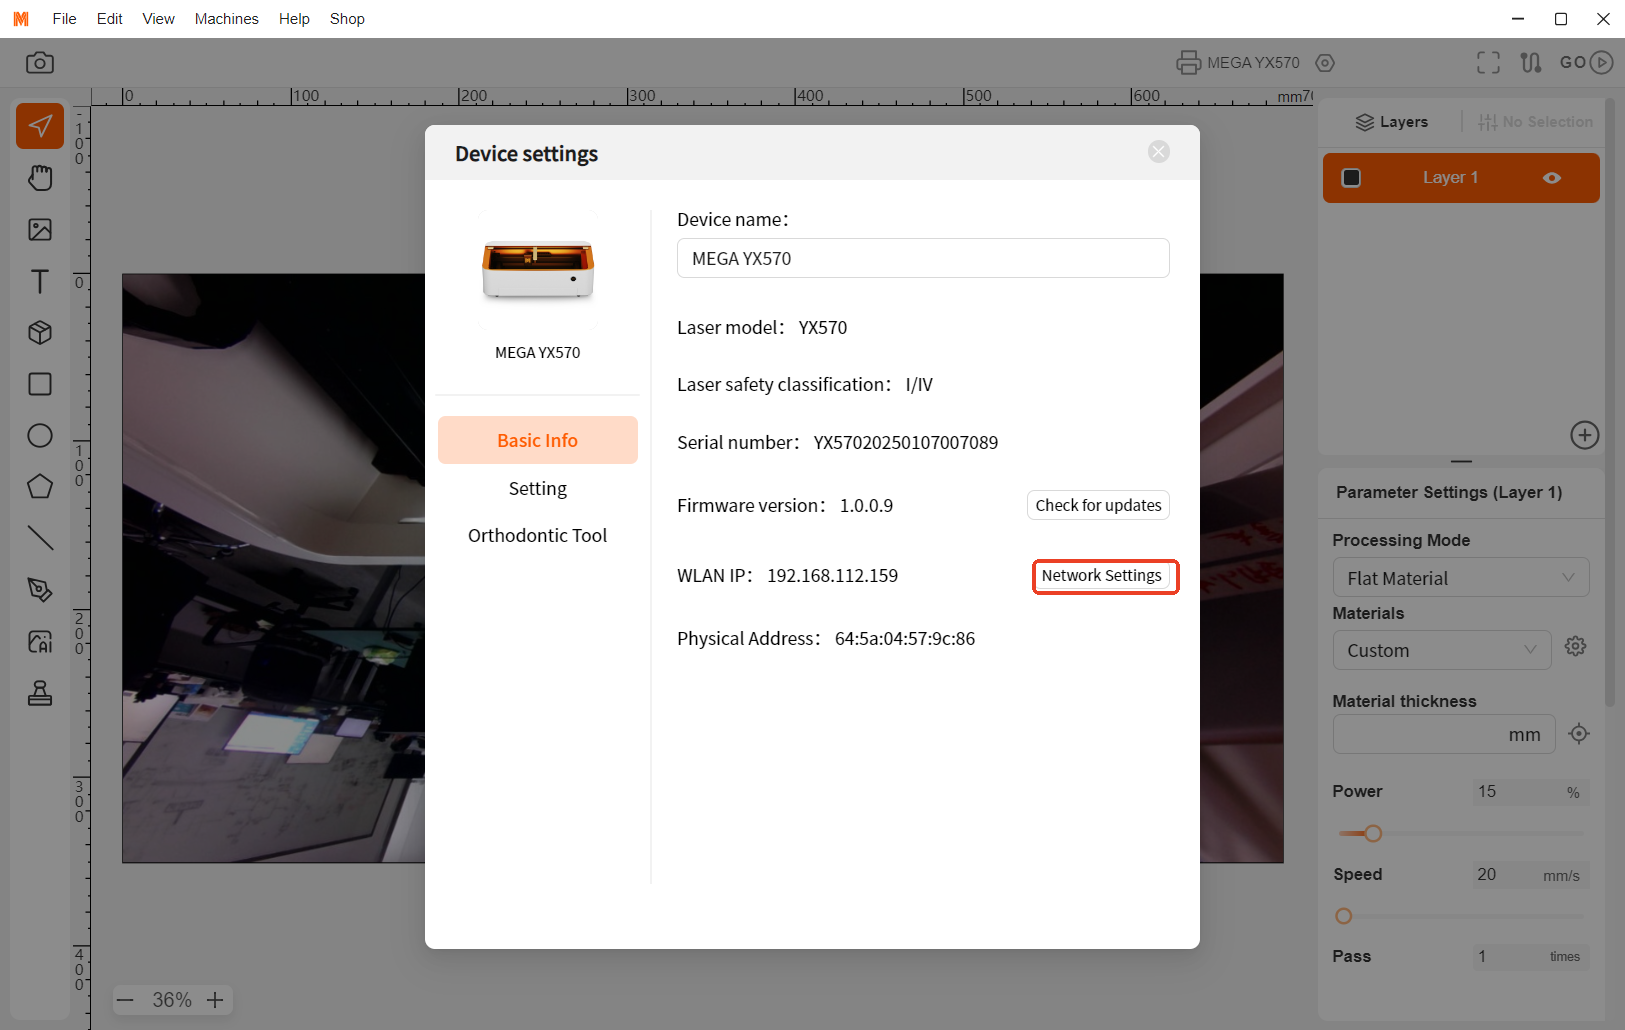
- After a successful USB connection,
your device name will appear at the
top right of MDH. Click the settings
icon beside it to go to "Device
Settings" > "Network Settings".
- Choose your Wi-Fi network from the list and enter the
password to complete the WiFi setup.
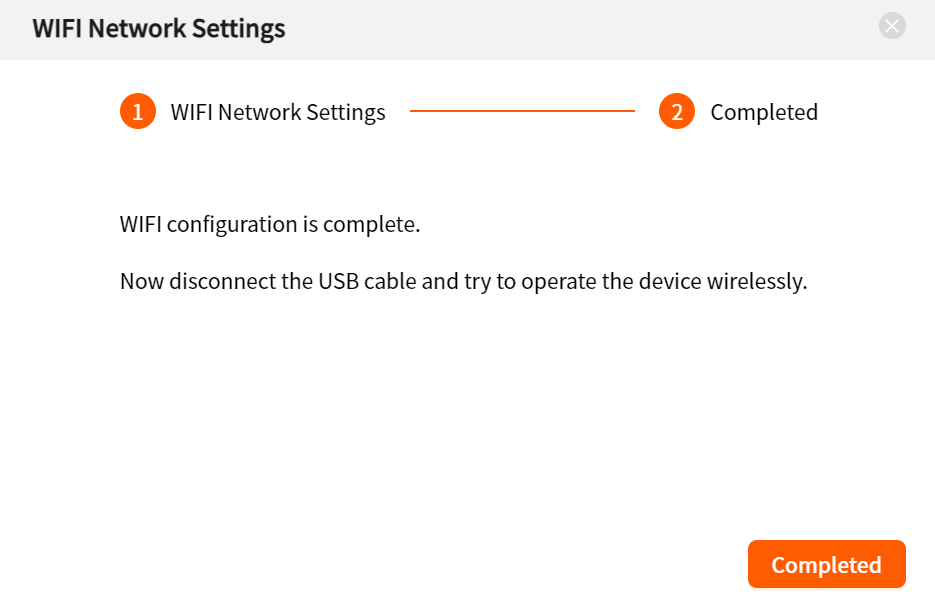
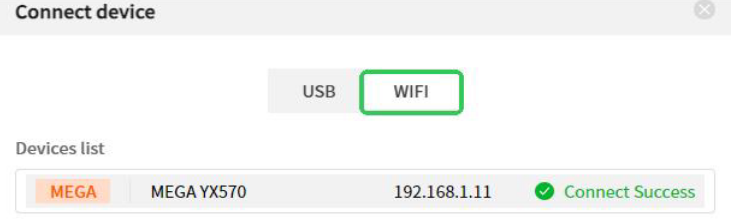
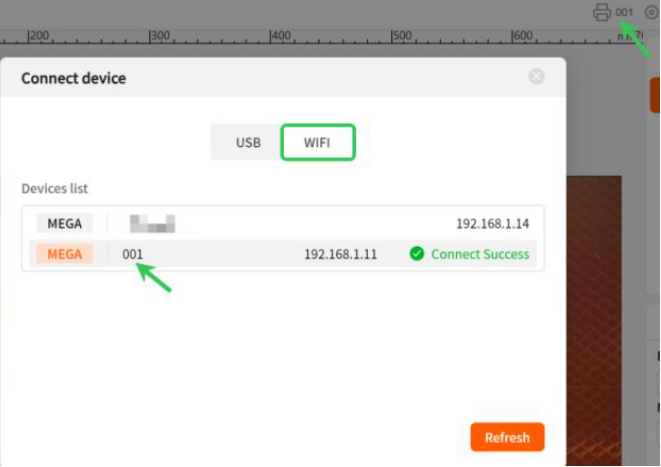
- Once connected, click your device
name to go to the "Connect Device"
page, select "WIFI" to view the
device and its IP address.
- You can now disconnect the USB cable and use Wi-Fi for future connections.
Important:
- To ensure a stable connection, avoid using special characters (e.g., !@#$) in the
Wi-Fi name and password.
- If you need to switch networks, repeat the configuration process.
- For further assistance, contact support at: support@monportlaser.com
¶ 2.3 Upgrade Mega’s Firmware
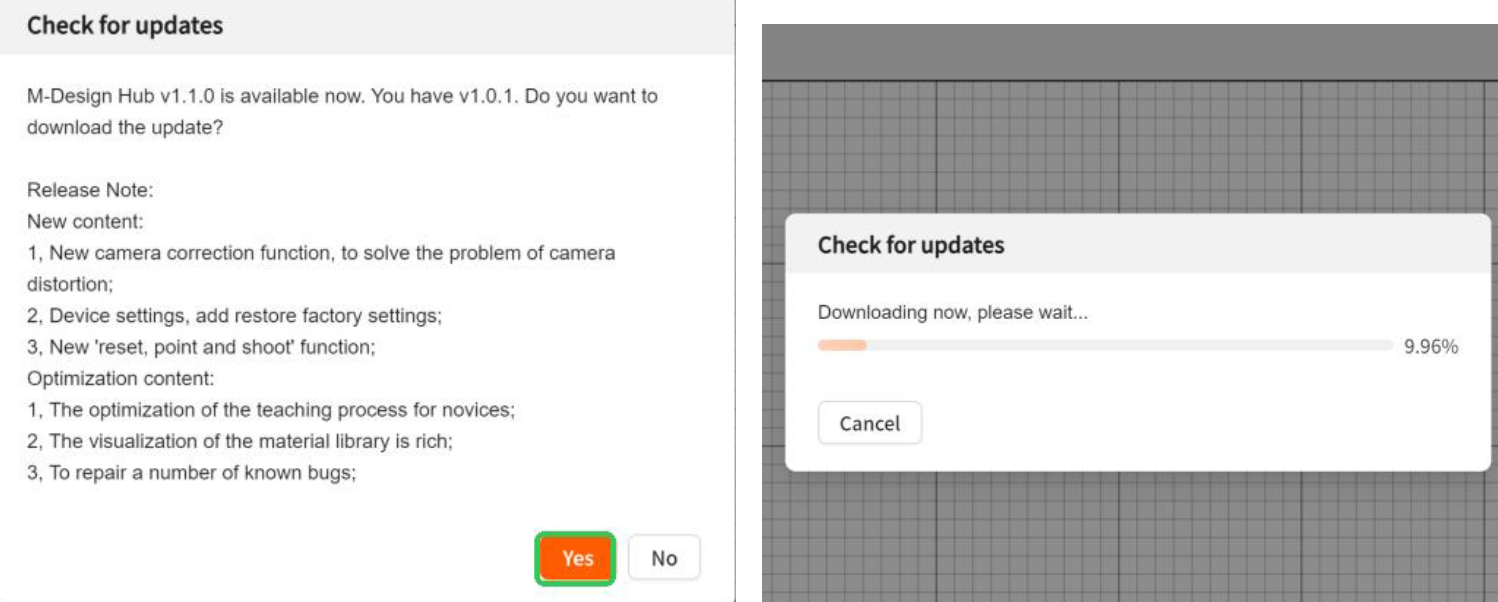
Firmware V1.0.0.9 updates automatically via M-Design Hub. Before proceeding, ensure
your MDH software is updated to V1.2.0. If using an older version, you will be
prompted to update.
Step 1: Click "Yes" to update when prompted, and wait for the process to complete.
Step 2: Click "Finish". The software will restart.
Step 3: Reconnect to your device via Wi-Fi.
Step 4: Once connected, the firmware will update automatically in the background
(about 3 minutes). Afterward, go to Device settings and check the firmware version.
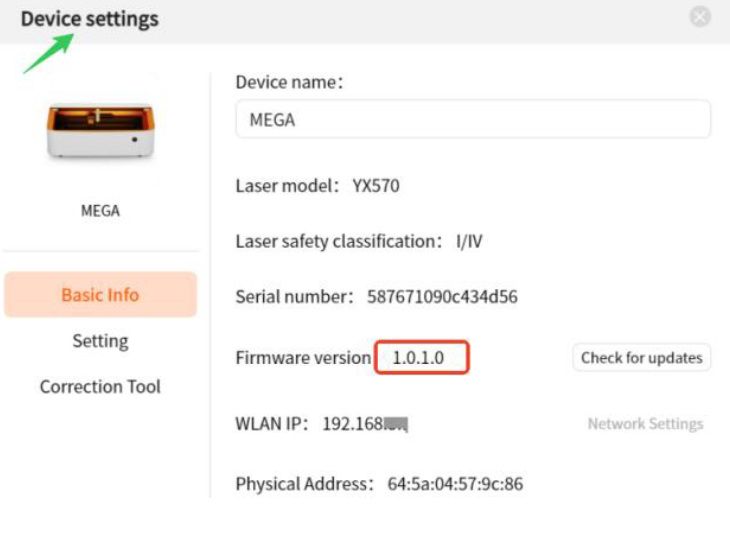
If the firmware version shows 1.0.1.0, the
update was successful.
If the update fails, contact our after-sales
support at: support@monportlaser.com
¶ 3. Preparing MDH Before Your First Project
Important Notes:
- Flame Detection Sensitivity:
The flame sensor is highly sensitive and may trigger false alarms. If the Mega device
sounds an alarm without an actual flame inside, there is no need for concern. The flame
detection software is still undergoing sensitivity optimization.
※ If you confirm that the alarm is due to a software issue, we recommend temporarily
disabling the flame detection function in MDH and re-enabling it after the new
firmware update is released on March 15.
- Water Flow Speed Detection:
Regional differences in temperature and altitude can affect water flow speed, and the
water flow detection software is still being optimized for broader adaptation.
※ To prevent any impact on basic functions, we recommend turning off the water flow
speed detection function in the MDH client while ensuring normal water flow. Future
updates will improve this feature.
¶ 3.1 Machine Settings & Default Parameters
Disable Flame and Water Flow Detection
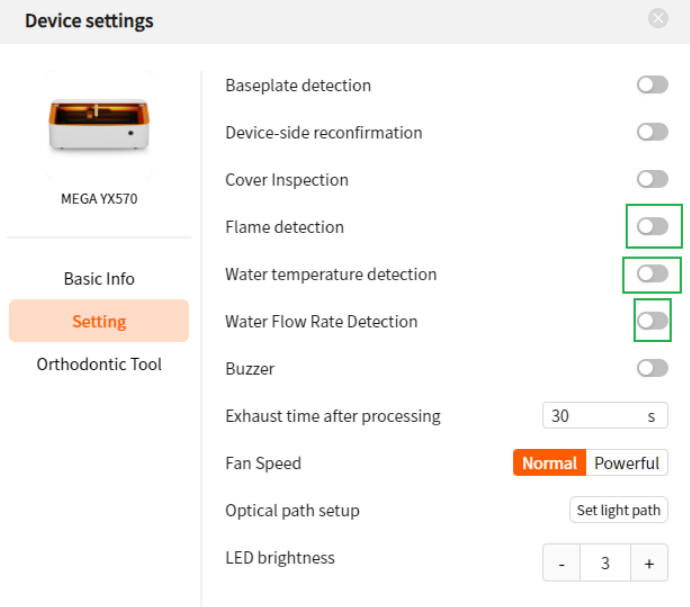
These features are still in development and
will be enabled in future versions, but they
may impact user experience in their current
state.
Set Up LightBurn for MDH
Before adjusting machine parameters, ensure your laser is properly set up in LightBurn:
Step 1: Download the Lightburn configuration file for Mega.
————Mega Configuration.lbdev————
For MEGA firmware version 1.0.6.3 or above, please set the connection baud rate of Lightburn to 230400. For versions below 1.0.6.3, set the baud rate to 1000000 for connection.
For MEGAS firmware version 1.0.1.3 or above, please set the connection baud rate of Lightburn to 230400. For versions below 1.0.1.3, set the baud rate to 1000000 for connection.
If the USB-connected device fails to recognize the COM serial port device, please download the serial port driver and install it before trying again. ——CH341SER.EXE——
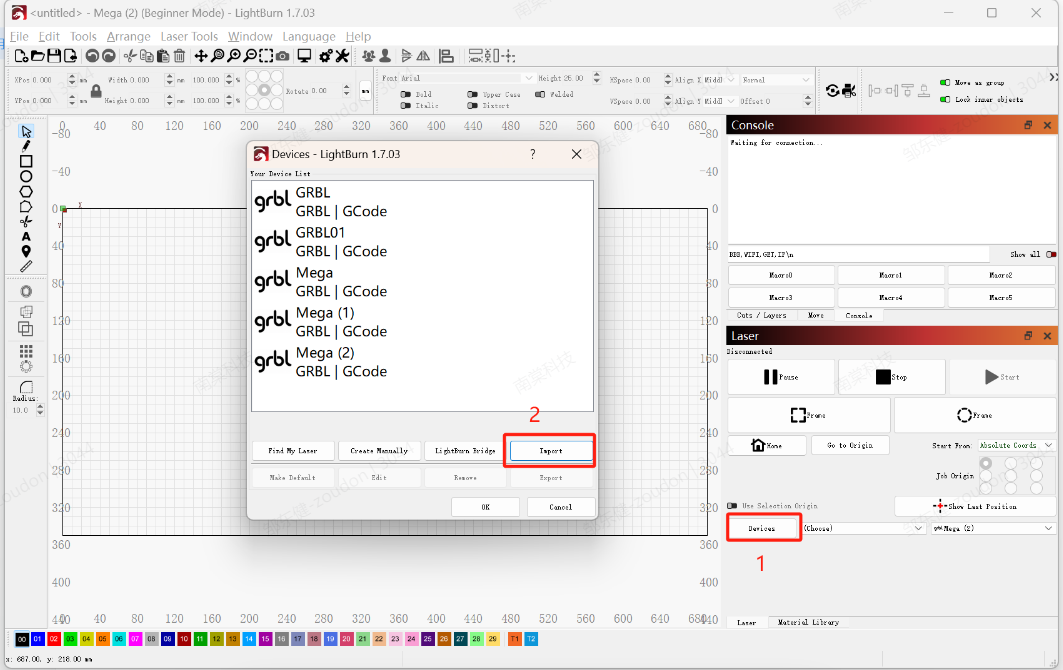
Step 2: Import the file into Lightburn
Drag the file to any position in the Lightburn window or click "Devices" -> "import" to import it.
Step 3: Name & Set Work Area
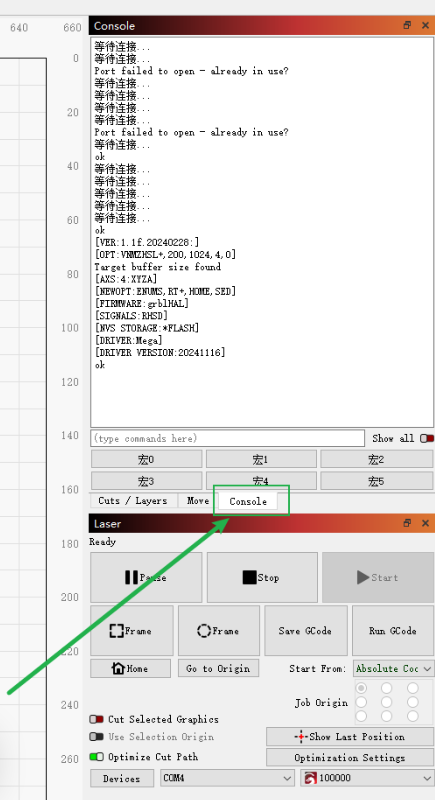
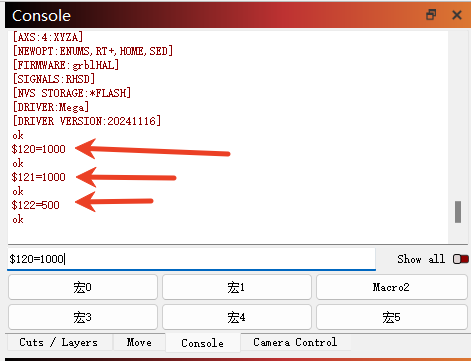
Step 4: Enter the following commands in sequence to set the optimal acceleration and
deceleration parameters: \$120 = 1000, \$121 = 1000, \$122 = 500
¶ 3.2 Adjust the Light Source & Focus the Beam
Step 1: Open the MDH software and
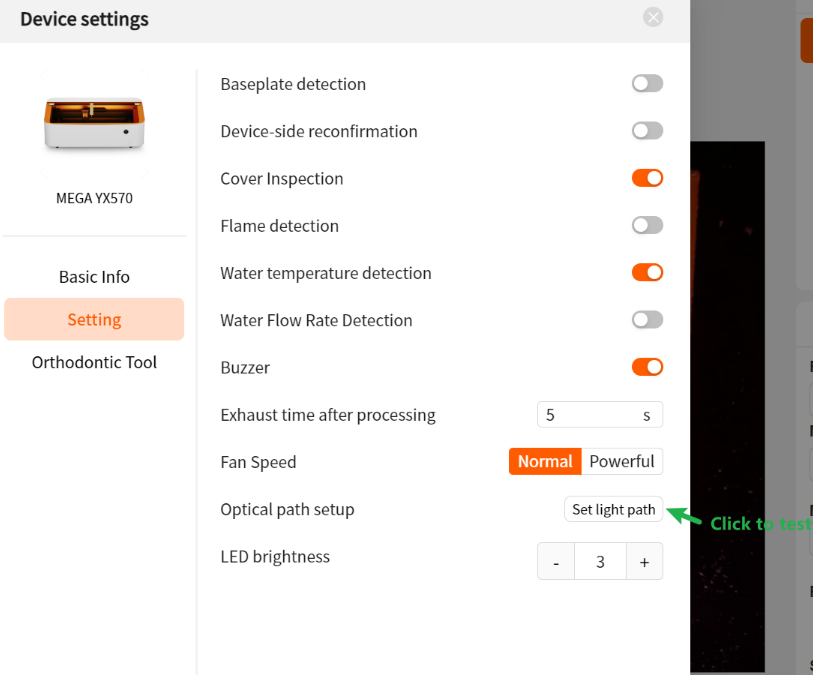
connect the device.
Step 2: Navigate to "Device Settings"
and click on the "set light path" to
emit red light.
Step 3: Adjust the First Mirror
- Place the optical target into the second
mirror holder.
- Move the X-axis up and down to verify
the optical path alignment between the first and second mirrors.
- If misaligned, use a hex wrench to adjust the first mirror holder.
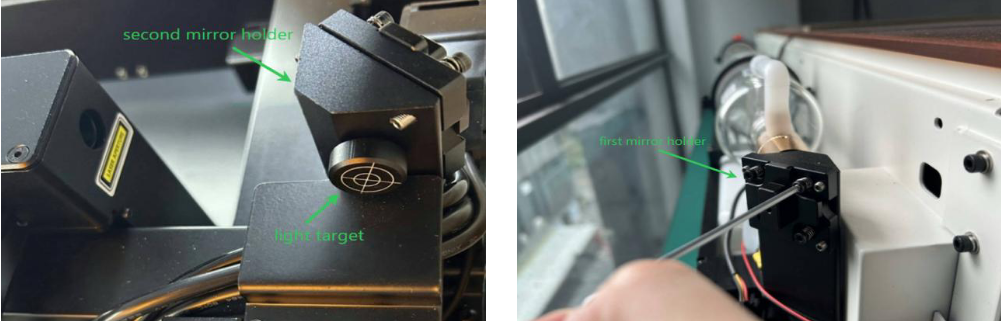
Step 4: Adjust the Second Mirror
- Place the light target into the laser head.
- Move the laser head left and right to check if the optical path between the second
mirror and the laser head is aligned.
- If misaligned, use a hex wrench to adjust the second mirror holder.
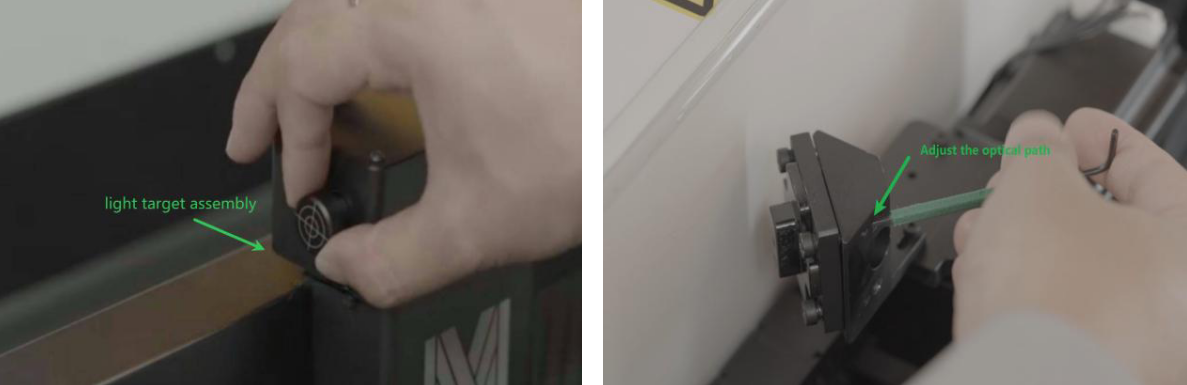
Step 5: Turn off the optical path test after adjustments.
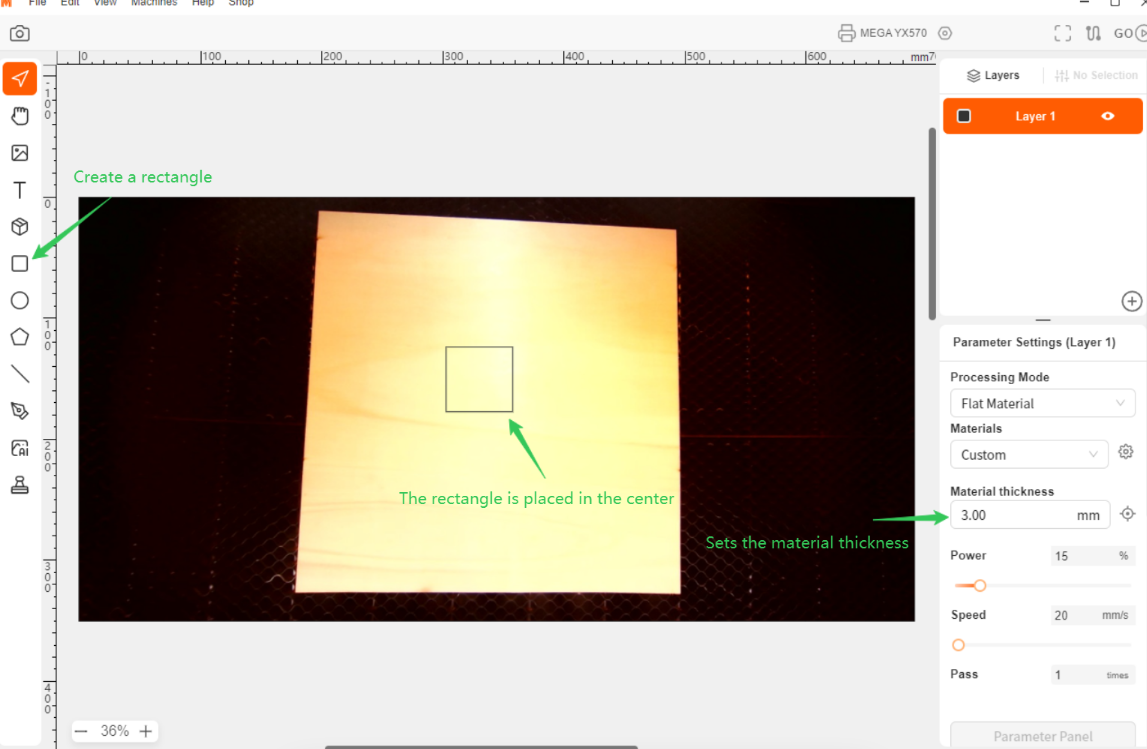
¶ 3.3 Verify Laser Output
Software Check:
Use the MDH software to confirm that the laser emits light during engraving.
Step 1: Create a small rectangle (e.g., 50×50 mm) and position it at the center of your
material. Set the material thickness.
Step 2: Configure the engraving settings to 15% power and 20 mm/s speed.
Step 3: Click "Preview" > "Start engraving" to begin the actual engraving. Observe
if the laser tube emits light during the engraving process.
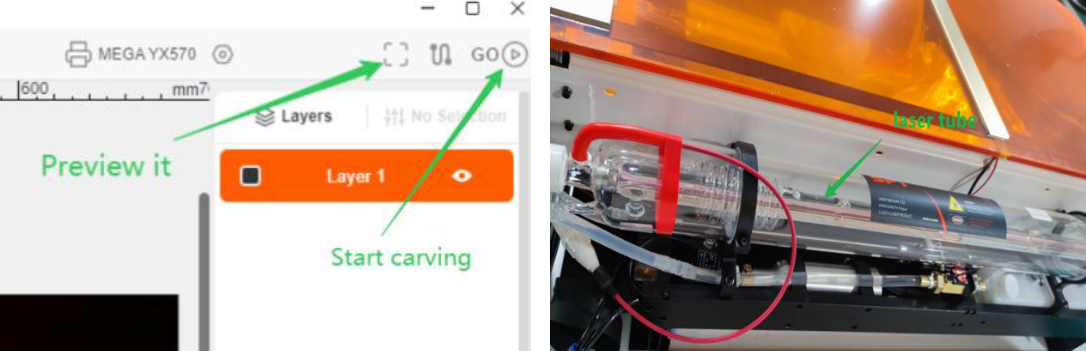
Hardware Check:
Step 1: While engraving, observe the
laser tube to ensure it emits light.
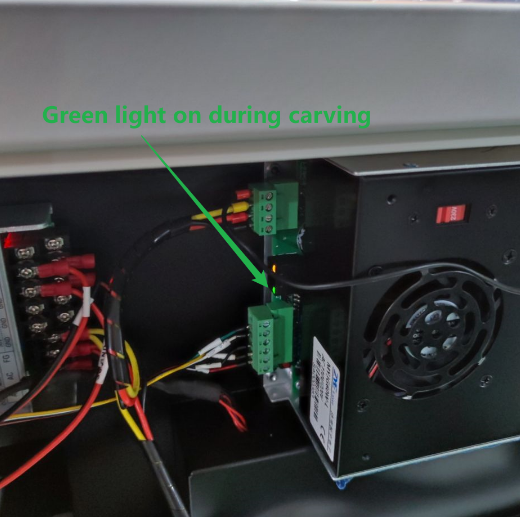
Step 2: If the laser tube does not emit
light, check the side laser emitter. Ensure
its green light is illuminated (the yellow
light should automatically turn on when
the machine starts).
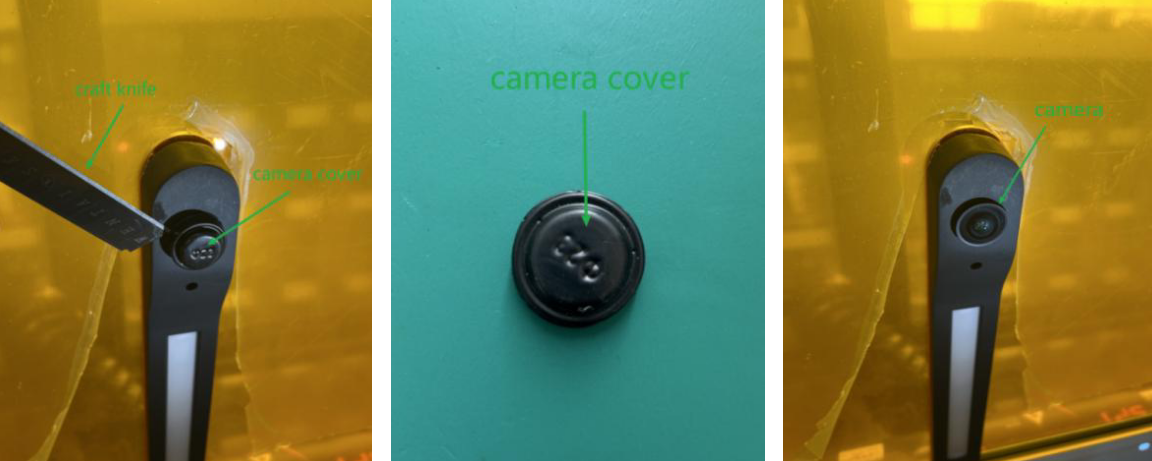
¶ 3.4 Remove the Camera Cover
Use a utility knife or other sharp tool to open the cover from the side. Do not rotate the
cover, as it may change the focal length and blur the captured images.
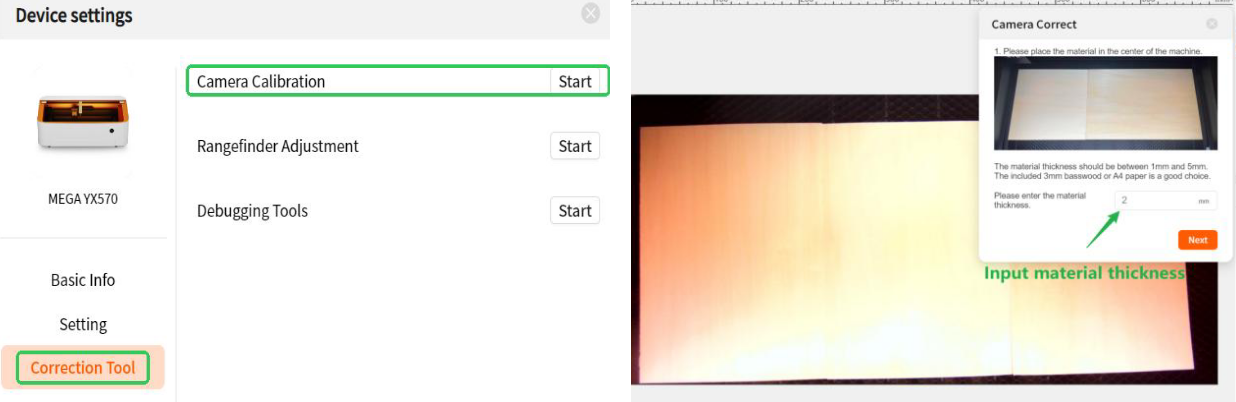
¶ 3.5 Camera Canvas Calibration
Before proceeding, calibrate the camera and canvas for precise positioning:
Step 1: Access the correction tool in the settings.
Step 2: Place the material, enter material thickness, and enable the engraving cross
element.
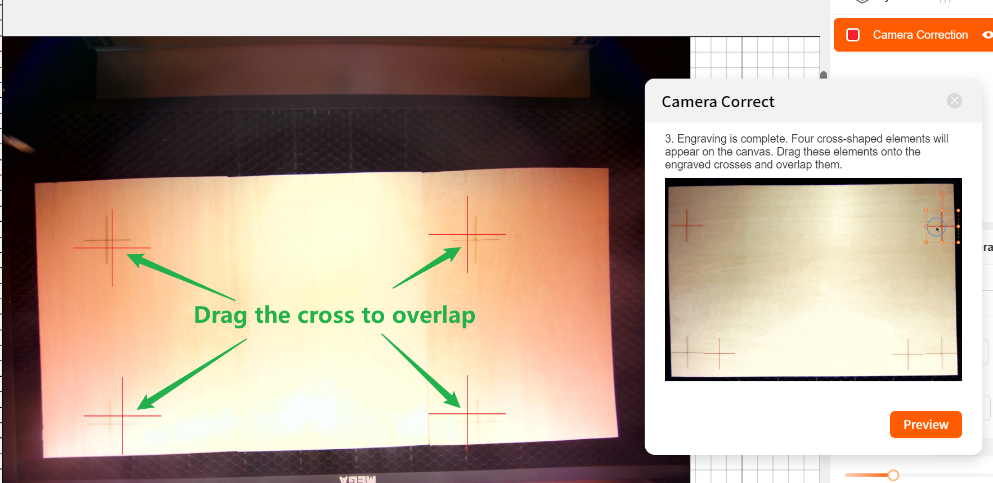
Step 3: Align the four cross elements with the engraved cross elements to complete
calibration.
You can also refer to our complete camera calibration video tutorial:
https://drive.google.com/file/d/1bSUxcotalmM20TxAzQ4-d8PSI6onLXo6/view?usp=dr
¶ 3.6 Familiarize with Mega’s Touch Screen Icons
The Mega’s front smart button screen displays various statuses of the cutting machine.
Refer to the images below for a visual representation of each icon and its corresponding
status.
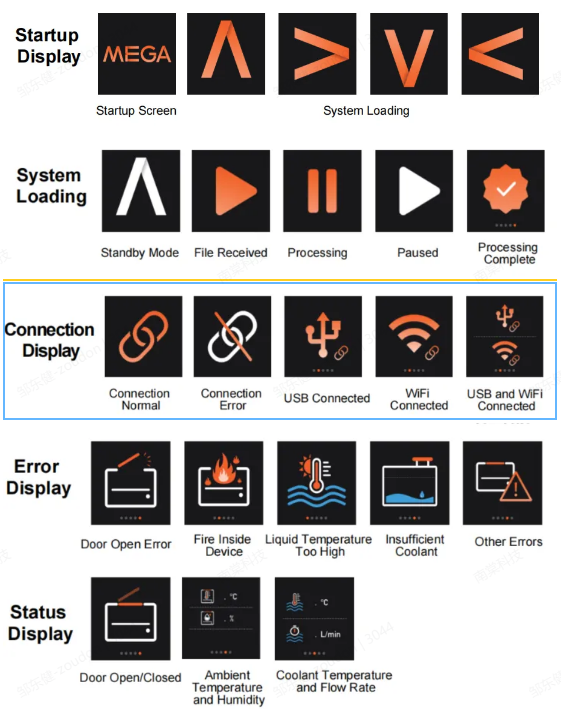
Important: Currently, the device can be controlled by swiping and pressing; rotating
the knob is not supported.
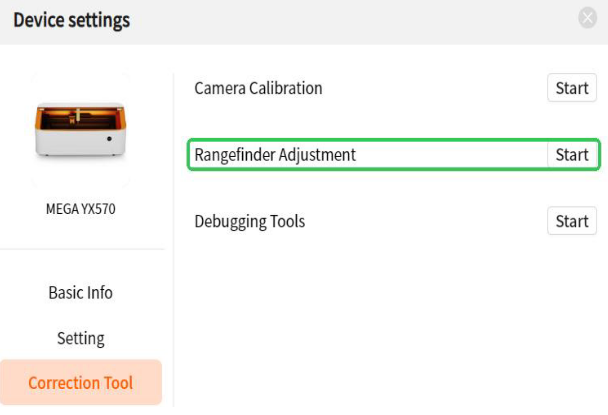
¶ 3.7 Distance Sensor Calibration
If you experience inaccurate material thickness measurements, calibrate the distance
sensor to enhance accuracy.
Step 1: Go to "Device Settings" > "Correction Tool" > "Rangefinder Adjustment".
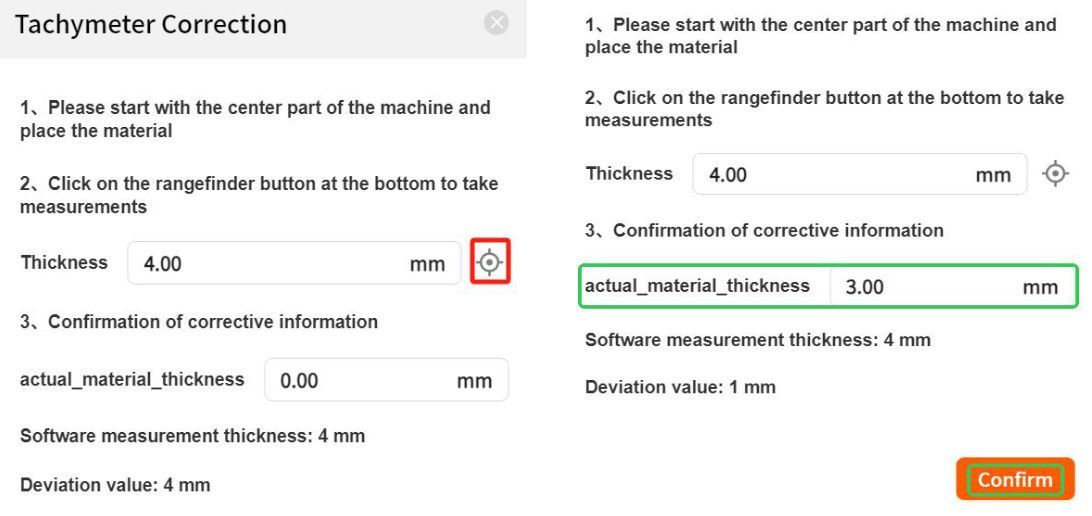
Step 2: Place the provided 3mm Linden wood inside the device and click the
measurement button.
Step 3: Enter the actual thickness of 3mm and click "Confirm".
¶ 4. Using MDH to Complete Your First Project
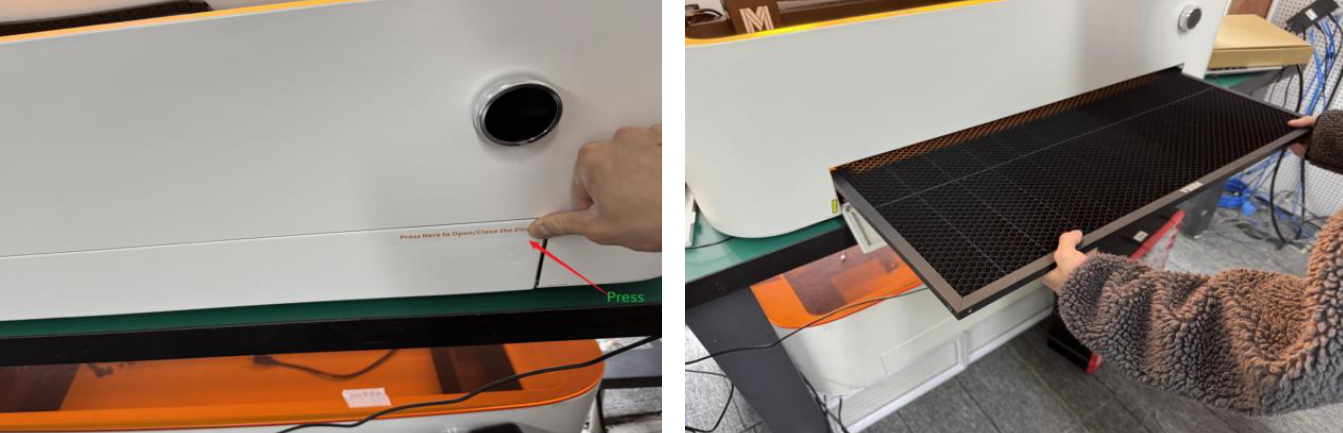
¶ 4.1 Place the Honeycomb Board
Open the bottom door of Mega, and insert the honeycomb board into the machine as
shown below, ensuring it is securely positioned.
¶ 4.2 Place the 3mm Plywood
Place the 3mm plywood sheet at the center of the honeycomb board.

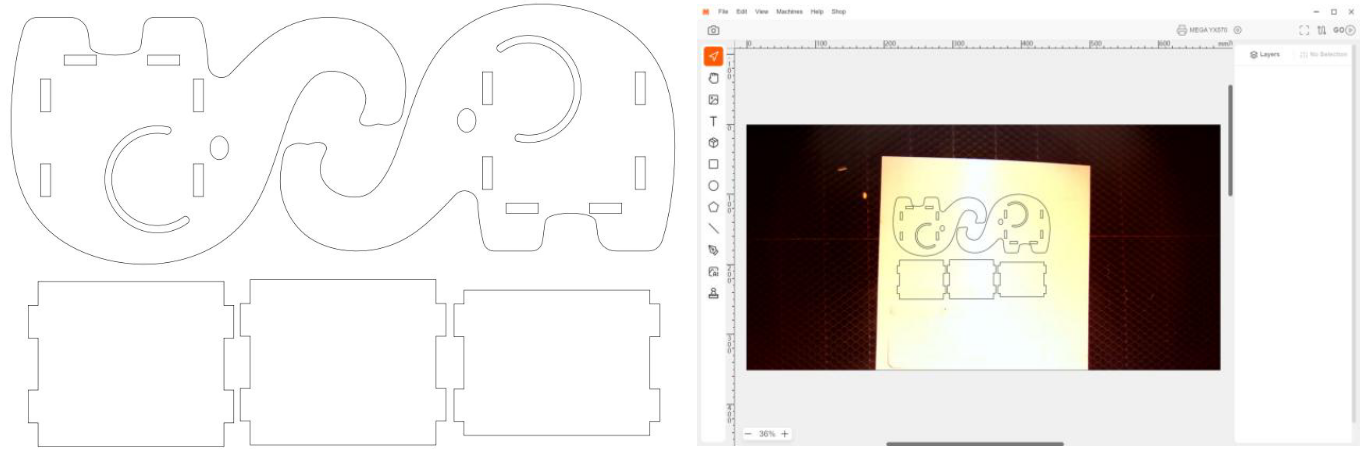
¶ 4.3 Refresh the Camera & Import File
Step 1: If your Mega device is already connected to the network, you can locate it
within the MDH software interface shown below.
Step 2: Download the provided file and import it into MDH. (Refer to the attachment.)
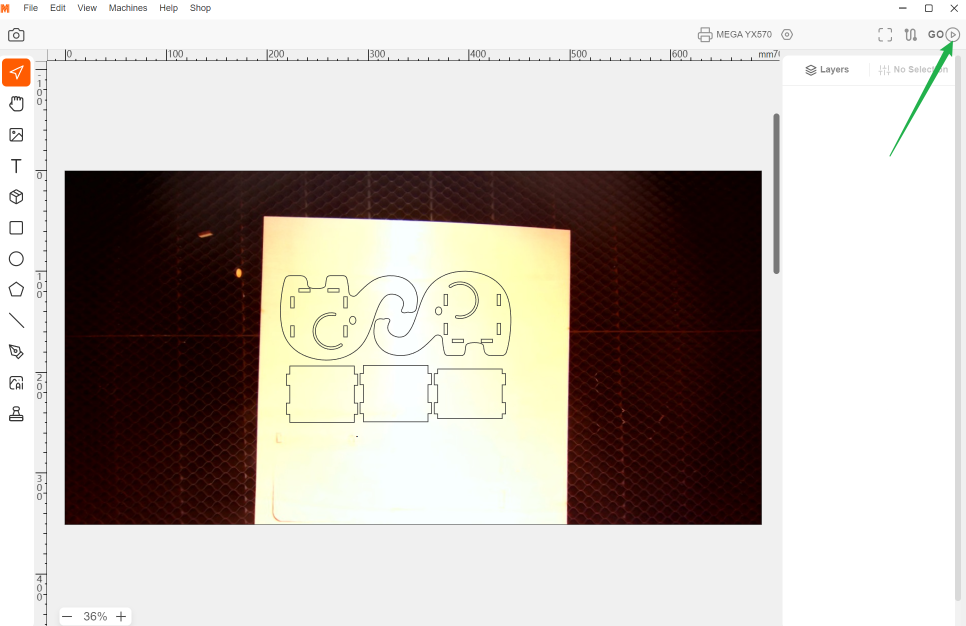
¶ 4.4 Upload File and Start Engraving
Step 1: After arranging the layout, click the designated icon to upload the file.
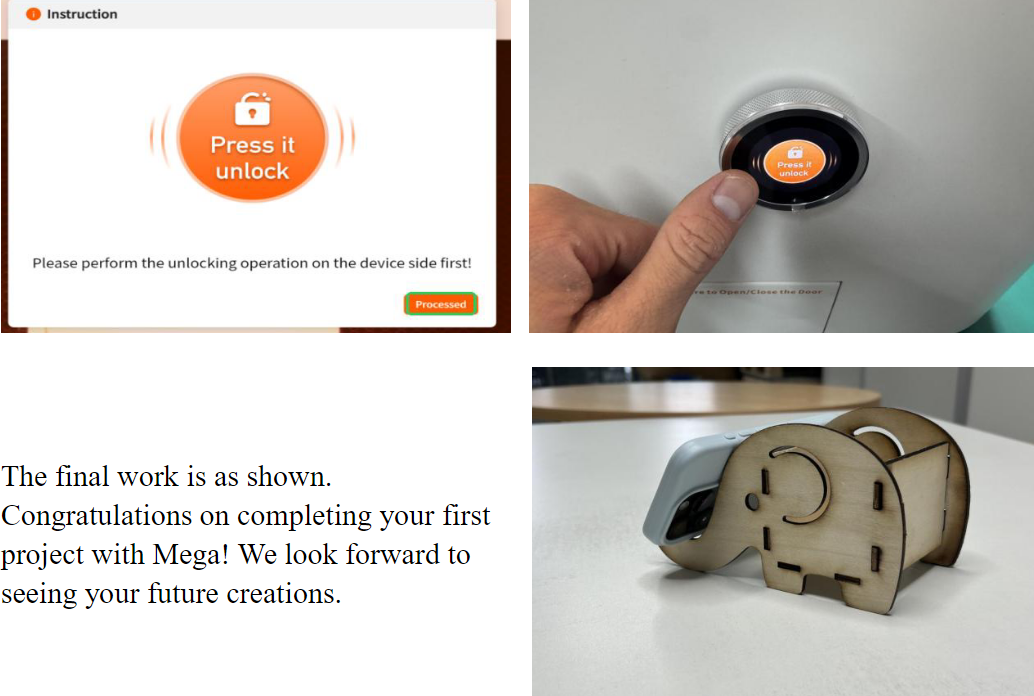
Step 2: After clicking, both the MDH software and the machine’s display will prompt
"Press it unlock". Press the indicated area to start the engraving process.
¶ 5. Explore Other Features
- MDH Software Operation Manual
- Mega Batch Filling Guide
- Mega Curved Surface Engraving Guide
- Mega Conveyor Belt Batch Operation Guide
- Mega Common Troubleshooting
- Mega Daily Maintenance
¶ 6. Contact Us
Support Email: support@monportlaser.com
Mega After-Sales Number: +1 303 210 9328
WhatsApp: https://chat.whatsapp.com/GTTrZQ0FqKv9Ex58vq8ZXw
WhatsApp QR code:

Facebook Official Group:
https://www.facebook.com/groups/8651579938232034